Pages

Monday, January 31, 2011

CREE RGBW LEDs have arrived

Here is a picture of the 3 RGBW CREE high intensity LEDs I ordered. These will be wired on the top of the back box for the cabinet, and will flash various colors during game play.

They will be ROM controlled and flash according to various game sequences that can be programmed for each table.

LEDs will need to be mounted on a heat sink before they can be installed, they are very small about the size of a quarter but deliver a lot of light.

Friday, January 28, 2011

Pinball Cabinet Video

Pinball cabinet is nearly complete, just waiting on art and will eventually install 3 LED flashers that are already wired for.

Here is a video demonstrating the software, and also the force feedback.


http://www.youtube.com/watch?v=mAxeYPCR_FE

Thursday, January 27, 2011

Cabinet Rough Installation Nearly Completed

Spent much of the day today cleaning up the wiring and finishing off the installation of all LEDWIZ controlled devices as well as iPAC inputs.

Using the real coin door buttons for the PinMame ROM controls. This will allow me to use the test buttons on the door to turn up and down the volume in the game, as well as change game features like how many credits, or other more advanced details such as when to award free balls etc. This feature will also allow me to test certain switches and solenoids just like in a real pinball machine, which will help me with LEDWIZ configuration to get lights and solenoids firing in sync with the game.


All that is left to install now is the 3 CREE RGBW LEDs that I have on order. Wiring is there, but I will need to install and solder these with appropriate heat sinks. These LEDs will be very bright, about 700 lumens. The LEDs will be installed in flasher caps on the back box, and will fire off different colors in time with the game.

Wednesday, January 26, 2011

Cleaning up the Wiring


Wiring is a bit of a mess right now. Started off thinking I would need only about 7 relays to drive 7 solenoids, I'm not up to 10 relays so that I can also drive a gear and shaker motor, as well as another solenoid for a knocker.

Once I have everything fit and working correctly, I will shorten the wires and clean everything up. Last piece to add are three CREE RGBW LEDs that I will mount on the top of the back box for flashers.

2 More Cabinets Finished

Building 3 cabinets total, first one is a bit of an experiment to understand how to create the force feedback and other effects, as well as to iron out software details and cabinet design.

Much faster building these second two, now that much of the learning curve is complete. First cabinet is almost finished, waiting for the 3 flasher LEDs to finish the LEDWIZ install, and cabinet art is ordered and on its way. Now that I've nailed down all the internal components, will be much easier to wire these as well, first one because of various changes and additions required many changes to the wiring harnesses so it is not as clean now as it could be.

Have an issue currently where the iPAC seems to want to fire off randomly, suspect it is related to EMF. I've isolated the solenoid wiring from the input button wiring, and am going to mount the iPAC in a grounded metal box and see if that resolves the issue.


Thursday, January 20, 2011

Pinball Force Feedback


Ford starter solenoids are installed and now firing in sync with events in the pinball ROM. Feedback is very realistic, and you can certainly hear and feel these solenoids when they fire. I am firing solenoids for events like left and right flipper, slingshots, knocker, and pop bumpers.

To make the solenoids louder I drilled out the rivets that hold the bottom to the solenoid housing, and removed the rubber and cork dampeners. They had a dull sound with these installed, and removing these pieces made them much more mechanical and sharper sounding. I was also able to flush mount the solenoids using screws in the holes where the rivets had been, to make them even louder I installed a couple of washers between the plastic and metal bottom so that the unit was not sealed to allow more sound to escape.

Only remaining items that need to be installed now for force feedback in the cabinet, are a gear and shaker motor. I have a lead on a couple of parts that should work, I will drive these off the same relays I use for these solenoids.

These solenoids draw a fair bit of current, testing them with a multimeter inline and looking for current in mAs, they draw 3 AMPs every time they fire. The controller board I am using can only drive devices of 500mA or less, so these would certainly do it in if it weren't for the 12V DC relays I am using to switch these off and on.

As far as power goes, I have the LEDWIZ powered by 12 volts from an extra PC power supply, the LEDWIZ activates the relays, and the solenoids are driven on their own seperate power supply that is isolated from the one I am using for the LEDWIZ. Ford solenoids can be found for about $13 after market, or about $8 at the autowreckers.


Wednesday, January 12, 2011

LED Testing


Here are some LED stripes I picked up, as well as a single LED. I have several colors in the strips and singles. Planning to power these using 3.3 volts from the power supply. Number of people tell me they should have a resistor, but since I'm using an optimum voltage I can't understand why?
If anyone has a good reason why these should have a resistor even though I'm using the correct voltage though let me know.
I could see it if I was driving them with 12 volts or something, but they seem to work fine with the 3.3 volts and aren't putting any load on the power supply.
Definately after building the Pinball cabinet have some ideas for these lights, was thinking to create some ambient lighting effects in the basement theater room that could be timed to music etc. But that is a little bit lame, and not a huge priority. It's just I've bought a lot of LEDs, and probably won't end up using them all.

Wiring mostly complete now for Pinball Cabinet

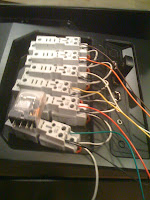
Wiring is nearly completed for the cabinet now. Here is a pic of all of the relays I am using to drive car starter solenoids that will fire when Rom events like sling shots or pop bumpers fire in the game.


I have 7 relays now, but am going to pick up a couple more.


Plan to drive the following using these relays: 1 shaker motor for rumbling the cabinet, 1 gear motor for playfield motions like drawbridges raising or lowering where originally a gear motor was used, 2 solenoids for the flippers, 2 solenoids for the sling shots, and 3 for pop bumpers, I plan to use the solenoid out of a doorbell and have it strike against a metal plate for a ball knocker. Based on all that I'll need a couple more, so all totalled I'll eventually have 9.


Additionally I will control the LED buttons for start, extra coin, and launch ball, as well as drive 3 RGB LED flahsers that I will mount on top of the cabinet. To control all of the relays and these eventsI will be using a 32 port LEDWIZ, and powering everything with 12Volts DC.


Working through the game inputs now, have most thinks working how I want except for the tilt, was going to use real pinball tilt sensors, but they seem to want to double tilt all the time so I may just go with mercury switches instead or have to fine tune the software further.
Here is a pic of all of the power supplies I am running. Have 3.3 volts, 5 volts, and 12 volts available. Haven't found a need for 5 volts yet, but will use 3.3 volts to power LEDs in the side of the cabinet, and 12 Volts for the flasher LEDs and everything else. Except for the shaker motor where I may want to use 110 Volts AC if I can get a more powerful motor, although I don't want the machine to start walking on it's own so will have to be careful there.


Speakers Mounted in Pinball Cabinet


Mounted the Sony Explode car speakers in the Pinball cabinet today. They look great and sound really good, I'm powering them with the Logitech 2300 2.1 System I picked up for about $30 in town. To connect them I cut the satellite speakers off of the cable from the sub woofer, and wired these speakers to that.


The sound is much better than the satellite speakers put out.

Tuesday, January 11, 2011

Raster Image to Vector Before/After for Artwork

Here is a before picture and an after picture. The before picture was very dark and not very detailed, I used inkscape to turn this raster image into a vector image and recolor everything.


Monday, January 10, 2011

Pinball Cabinet Artwork Completed

Didn't feel like shelling out big bucks to use Adobe Illustrator for creating vector art to use on the pinball machine, really enjoy using Inkscape though and the price can't be beat.

Here are some pics of the artwork I printed on 8.5 X 11 pages, lots of 8.5 X 11 pages :)

Will tape these all together and test fit them on the cabinet, plan to have a black background which will really make the art pop, but didn't want to print everything in black and kill my print cartridge.

These vector images were created from raster images I found on the pinball database. Used art from the Pinbot genre, including Jackbot, Pinbot, and also Bride of Pinbot.

For the cabinet art on the side, I plan to animate the 1-8 numbers and Jackpot on the robots leg with LEDs. I will either make a circuit board to drive this animation, or cheat and hook up a LEDWIZ or some other output controller to create the effect. Working with the printing shop now to understand if the vinyl they use is clear in which case I'll just inlay LEDs in the cab and have them under the decal and they should light up the images I want. Have to test it but if this approach won't work then I'll have to inlay acrylic cutouts or something.

The effect should look great though, I will time it so that it slowly goes up, and then blinks like mad when the jackpot level is reached, this animation will just play all the time and won't be linked to any of the Visual Pinball software I am using.


Computer Power Supply Hacked to Power LEDWIZ


Using a computer power supply to drive the LEDWIZ, and a power supply from a printer that is 12V to drive all the relays that will power all of the car solenoids etc for the force feedback/noise generation of the pinball machine.
I basically cut the end off the power lead to the motherboard, tested the wires and wired them to a wiring block. Now I have 5V, 12,V and 3.3V power that I can use.
I plan to use the PC only for the LEDWIZ, and will only use 12Vs off of the computer power supply. But the 3.3 voltages will come in handy if I want to wire in some LEDs and not use a resistor.
To make the power supply turn on you have to short a couple of wires, and also you should hook the sensing wire of the regulator to 3.3 volts on the power supply.

Saturday, January 8, 2011

Wiring the Pinball Cabinet for Feedback


In order to make the pinball cabinet as realistic as possible I'll be running LEDs as flashers, and also creating the feedback and sound of a real table when pop bumpers, sling shots, or flippers are fired by using car starter solenoids.


Running a 16 input and 16 output LEDWIZ. The LEDWIZ can only drive 500mA of current, so in order to isolate the circuit I'm running relays between the LEDWIZ and the solenoids which will take more than that. Both the LEDWIZ and the solenoids will have their own 12V power supplies.


Really happy with the kick the solenoids provide, very pinball like.


Wednesday, January 5, 2011

LEDWIZ Outputs


Planning to use a PC board called the ledwiz to control my input buttons, and also drive up to 16 output devices.


Number of these will be hooked up to LEDs and also control the lighting of the buttons, but also looking to create a more authentic feel by driving solenoids and other feedback type devices to recreate pop bumpers, slingshots, flippers, and knockers etc.


Played around with a doorbell today, the coil had good punch and I can fire the metal rods into metal or wood and create a nice knock sound that should make a real nice imatation knocker for extra ball awards.

All Software Working Now


Took a couple of days but finally figured out the software. Running a program called hyperpin for the front end, allows you to scroll through and select the pinball table you want to play. I haven't configured any future pinball tables yet, but have a couple of virtual pinball ones.


The VP ones play great, I've heard mixed reviews about the future pinball ones but will give them a try. Running a program called UVP for the backglasses, animates them really nicely.


A lot of people running these software programs complain about lag and stutter, but I haven't noticed any yet. Here is a pic of fish tales with UVP, VP, and VPMame all running.

Cabinet starting to look like a Pinball Machine


Made a lot of progress today, have the cabinet pretty much complete now except for 1 last board I need to cut but couldn't because my saw died.

Working through setting up the software which is quite a chore with 3 monitors running off video cards with over 5 ouputs each on them, and the 6 or 7 software programs required. Hopefully after I get one table running I'll understand how to add the rest.

Once I get all this working the real hard part begins though which will be wiring the 16 or so input buttons etc, and then working through the 16 ouputs I am setting up including LED lighting, flipper feedback, gear motors, and solenoids that will all be driven in context with the game.


Monday, January 3, 2011

Cabinet Back Box Attached to Main Cabinet


Here is the cabinet back box mounted on the main cabinet. Working through mounting the 42 inch TV for the playfield today, and then will figure out the wiring.


Saturday, January 1, 2011

Main Cabinet


Cabinet is now cutout for the virtual pinball machine. Need to figure out where I want all the buttons and cut those out, as well as mount the 42 inch TV fo the playfield. Hope to have everything assembled for testing tomorrow.


Once I'm happy with how everything fits I'll disassemble it all, and then finish with high gloss paint.

More build work on Visual Pinball Machine


Backbox is nearly complete. Here you can see the 32 inch Sanyo TV mounted with the 19 inch monitor to create the DMD display.


Picked up sony 4" car speakers that will fill the speaker cutouts beside the DMD screen. Was able to use the TV bezel in order to create a nice flush look.